TigerBlue
Gold forum user
- Messages
- 827
Report on: Tiger Clutch Slave Rebuild and R&R
Back in December (2009) I fired up Tiger Blue for a "just for the heck of it" drive and found I had a problem. Clutch pedal was feeling funny and although it worked the clutch was engaging just off the bottom of the travel. Not good! Checking the clutch master confirmed an issue with the fluid level at the bottom of the bowl. A leak! someplace. Getting underneath I found that the slave cylinder had some glistening drops of liquid on the working end.
I have a 1999 receipt for both the clutch slave and master cylinders indicating their age, over 10 years! I ordered rebuild kits from C.A.T. Parts guessing they were in pretty good shape because the car had been used regularly. Pitting/corrosion in the area of the bore where the piston seal travels may not be successfully reconditioned. I could do the work myself or take it to a mechanic but driving would be iffy? Other than being lazy I had no good reason not to give it a try. No problem working in the garage here in the California winter. (Sorry Duke)
Some of the things I considered important to getting it done safely and other things I learned (some of which I needed to learn again the hard way) as I went along:
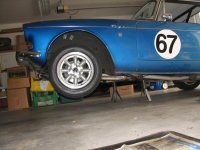
Jack it up as high as safely possible. Use safety stands!
Use fender covers always but be very very careful with the brake fluid. It eats paint to the metal if you let it. I know this.
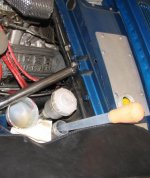
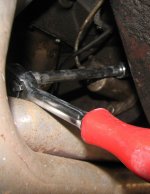
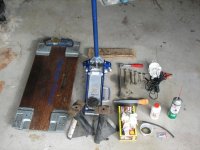
Headers make this a harder job than it should be. I needed to try some different combinations of extensions and universals to reach the nuts and bolts. Tight work for large hands but doable.
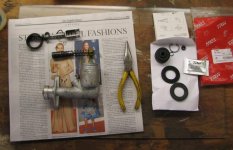
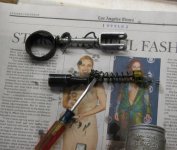
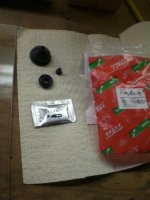
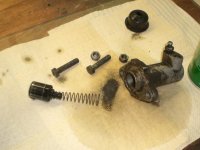
The rebuild kit had nothing you could call instructions. Only three parts and some lubricant. I only used the new boot and piston seal. The third part appeared to be a dust cap for the bleeder. Did not fit, I tossed it. There was some minor corrosion near the lip of the cylinder which I cleaned up with very fine grit. The bore further down where the seal moves looked great.
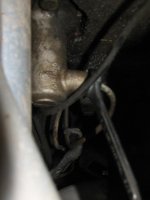
Be careful with the flare nuts on the hydraulic lines! Flare nut wrenches are a good investment to avoid rounding the flats off. The hydraulic lines are stiff, so do not bolt everything up and try to thread it in. In that tight space it is easy to cross thread. I did! and so I gave myself a time-out to think about a better way. The following day I removed the cylinder from the car again and used the bleeder (same threads) to clean up/chase the threads for the flare nut. Then more carefully with the cylinder free to move, (no bolts) succeeded in getting the flare nut started and several turns in. For the second time I installed the bolts and tightened things up. Whew! Dodged a bullet there!
Decided to defer the rebuild of the clutch master until later so filled it and bled it. The slave is working again like new!
Rick
My clutch bleeding method:
1. Fill the reservoir.
2. With the bleeder open move the clutch pedal a few short strokes until fluid exits the bleeder.
3. Tighten the bleeder and refill.
4. Call a helper to push the pedal to the floor and hold. Open and tighten the bleeder to let any remaining air out. Both you and helper should be done. Note: This method will not work for bleeding the brakes.
Back in December (2009) I fired up Tiger Blue for a "just for the heck of it" drive and found I had a problem. Clutch pedal was feeling funny and although it worked the clutch was engaging just off the bottom of the travel. Not good! Checking the clutch master confirmed an issue with the fluid level at the bottom of the bowl. A leak! someplace. Getting underneath I found that the slave cylinder had some glistening drops of liquid on the working end.
I have a 1999 receipt for both the clutch slave and master cylinders indicating their age, over 10 years! I ordered rebuild kits from C.A.T. Parts guessing they were in pretty good shape because the car had been used regularly. Pitting/corrosion in the area of the bore where the piston seal travels may not be successfully reconditioned. I could do the work myself or take it to a mechanic but driving would be iffy? Other than being lazy I had no good reason not to give it a try. No problem working in the garage here in the California winter. (Sorry Duke)
Some of the things I considered important to getting it done safely and other things I learned (some of which I needed to learn again the hard way) as I went along:
Jack it up as high as safely possible. Use safety stands!
Use fender covers always but be very very careful with the brake fluid. It eats paint to the metal if you let it. I know this.
Headers make this a harder job than it should be. I needed to try some different combinations of extensions and universals to reach the nuts and bolts. Tight work for large hands but doable.
The rebuild kit had nothing you could call instructions. Only three parts and some lubricant. I only used the new boot and piston seal. The third part appeared to be a dust cap for the bleeder. Did not fit, I tossed it. There was some minor corrosion near the lip of the cylinder which I cleaned up with very fine grit. The bore further down where the seal moves looked great.
Be careful with the flare nuts on the hydraulic lines! Flare nut wrenches are a good investment to avoid rounding the flats off. The hydraulic lines are stiff, so do not bolt everything up and try to thread it in. In that tight space it is easy to cross thread. I did! and so I gave myself a time-out to think about a better way. The following day I removed the cylinder from the car again and used the bleeder (same threads) to clean up/chase the threads for the flare nut. Then more carefully with the cylinder free to move, (no bolts) succeeded in getting the flare nut started and several turns in. For the second time I installed the bolts and tightened things up. Whew! Dodged a bullet there!
Decided to defer the rebuild of the clutch master until later so filled it and bled it. The slave is working again like new!
Rick
My clutch bleeding method:
1. Fill the reservoir.
2. With the bleeder open move the clutch pedal a few short strokes until fluid exits the bleeder.
3. Tighten the bleeder and refill.
4. Call a helper to push the pedal to the floor and hold. Open and tighten the bleeder to let any remaining air out. Both you and helper should be done. Note: This method will not work for bleeding the brakes.
Attachments
-
 03_Jack_it_high.jpg80.8 KB · Views: 692
 -
 05_suck_out.jpg102.6 KB · Views: 626
 -
 07_loosen_flare_nut.jpg44.5 KB · Views: 642
 -
 10_remove_Slave.jpg75.2 KB · Views: 600
 -
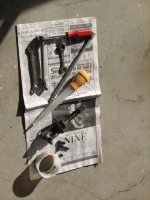 13_Tools.jpg96.3 KB · Views: 621
 -
 33_Rebuild_kit.jpg60.2 KB · Views: 585
 -
 35_Disassemble_Slave.jpg77.4 KB · Views: 692
 -
 42_All_Tools.jpg85.9 KB · Views: 672