Jerico and Hydraulic TB Set Up

sandy

Gold forum user
CAT Member
Messages
349
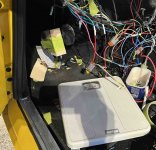
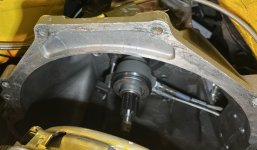
While waiting on some parts started working on setting up the Jerico 4 Speed. I had partially set the linkage up but now time to lock it down. Also in installing the RAM Hydraulic Throwout Bearing.

The Jerico is similar to a Toploader but bigger in most respects. My car was modified to support this larger gearbox.

At the time no one made a Hydraulic TB for this combination of Ford, Jerico with it's 1 1/8" x26 spline input shaft size, but I found the RAM Chevy 78125HD would just about do it, and a well built part. The others that might have fit were not very well made or had a history or issues. About the only one's I would try at this point was Tilton or the RAM. The 78125HD is for a slightly smaller bearing retainer size, so had mine turned down a bit to fit. All good.

Now RAM does make one that would fit in the transmission, but basically the same with a larger hole...

To make the hydraulics reliable you need to set them up properly and use the proper fluids, if not, you are doomed. If you don't like using these in a Tiger I can see why, it's a difficult job to replace. In my case, my trans can come out the bottom with no issues due to the removable X brace. Also if you run headers, getting rid of an external slave that is right next to the exhaust is a good thing.

Setting up requires measuring a few things as outlined in the instructions, and all good to go... except it won't quite work due to the guide pin that holds the bearing in places is way to short for the amount of extension I need to just be .100-.200 off the fingers of the pressure plate. It's not problem shimming, but the pin is too short. An email to RAM and they make a 'extended guide pin' which is about an 1" longer that is trim to fit. Shazaam I didn't have to make something.

Now time to lock down all the shifter parts, safety wire things and add some top secret grease to the Long Nascar style shifter. And the top secret tip from GForce who sells the shifter is to use Anti-size on the rails and moving parts as it stays put. OK, I'll give that a go.

Almost ready to bolt back up and double check all the measurements and clearance.

Keeping it moving!

20240701_155115.jpg


20240701_161011.jpg


20240701_161015.jpg


20240703_111449.jpg


20240703_115925.jpg


20240703_121735.jpg


20240704_171509.jpg


20240704_171512.jpg


20240705_121117.jpg
 

Carbuilder

Gold forum user
Messages
107
Hi Sandy,

I installed a RAM hydraulic throwout bearing in my 347 stroker to T5Z tranny. While I haven't driven the car, I have sat in it and tried the clutch. Very heavy.....VERY heavy. Pretty sure it is all bled OK, but I may check that; not sure if that would affect the effort. Since my car has a lot of non-stock parts, I don't know the pedal ratio and haven't checked it yet. Also, I think I have the recommended size of master cylinder.

I realize we have different equipment, but let me know how it feels when you have it together enough to try. I had a pretty heavy effort before with the slave cylinder and bracket arrangement and thought this would take care of it. My clutch is pretty much stock.

Rick
 

sandy

Gold forum user
CAT Member
Messages
349
Hi Sandy,

I installed a RAM hydraulic throwout bearing in my 347 stroker to T5Z tranny. While I haven't driven the car, I have sat in it and tried the clutch. Very heavy.....VERY heavy. Pretty sure it is all bled OK, but I may check that; not sure if that would affect the effort. Since my car has a lot of non-stock parts, I don't know the pedal ratio and haven't checked it yet. Also, I think I have the recommended size of master cylinder.

I realize we have different equipment, but let me know how it feels when you have it together enough to try. I had a pretty heavy effort before with the slave cylinder and bracket arrangement and thought this would take care of it. My clutch is pretty much stock.

Rick
Change the master to a smaller size that may be part of the problem.
 

Carbuilder

Gold forum user
Messages
107
I checked RAM's website and they recommend a MINIMUM size mater cylinder of 3/4". That is what I have. They also say a 1" stroke is needed.

I think I do have the stock pedal set-up. I measured as best I could and have about 2 1/2" from the pivot to the cylinder rod. Also about 12" from pivot to pedal, so that gives a ratio of about 4.8:1. I read on a forum that 6:1 is the ideal ratio for correct pedal effort and operation. I haven't measured the stroke. If I could change the pivot distance to the cylinder rod to 2" that would give a 6:1 ratio and reduce the pedal effort by 20%. Assuming the pedal travel and piston stroke would be OK, that may be an option.

I'll check a few more things.

Rick
 

sandy

Gold forum user
CAT Member
Messages
349
I checked RAM's website and they recommend a MINIMUM size mater cylinder of 3/4". That is what I have. They also say a 1" stroke is needed.

I think I do have the stock pedal set-up. I measured as best I could and have about 2 1/2" from the pivot to the cylinder rod. Also about 12" from pivot to pedal, so that gives a ratio of about 4.8:1. I read on a forum that 6:1 is the ideal ratio for correct pedal effort and operation. I haven't measured the stroke. If I could change the pivot distance to the cylinder rod to 2" that would give a 6:1 ratio and reduce the pedal effort by 20%. Assuming the pedal travel and piston stroke would be OK, that may be an option.

I'll check a few more things.

Rick
The pedal ratio will help but will do effectively the same thing as reducing the ratio. You still need to make sure you can release the clutch.

For the travel on the hydraulic concentric style bearing is limited to about .8" as I recall with about .15" of that being used by the gap. Key is if too much gap you may not have enough pedal travel with either smaller master or changing the ratio.

Lastly, if the pressure plate is a 3 finger type it may also just be harder to press, diaphragm is a better way to in most cases.
 

Carbuilder

Gold forum user
Messages
107
I know I am hijacking your thread here, so if you'd rather I didn't, just let me know and I can start a new one.

I set the release bearing gap to just under .2". I'll try and have a look with a borescope tomorrow and see if it looks OK. I measured the pedal travel and have about 6" now and the clutch cylinder travel seems to be around 1"....hard to measure it, but that is about what it should be.

My clutch is a diaphragm type, more or less stock for the 302 engine; certainly not a heavy duty or racing one.

I measured the pedal effort with a very scientific method. :)

Screenshot 2024-08-13 at 8.30.44 PM.jpg

I taped a bunch of wood blocks to the pedal so I could put a bathroom scale on it and depress the clutch without it hitting the brake pedal. Not super accurate, but in the ballpark.

The maximum force as the pedal is moving is around 75 lbs. With the pedal fully depressed it is around 60-65 lbs. That is way too much but don't see what I can do about it. It seems that everything I measured checks out OK. I'll email RAM and see what they say.

Now that I've got everything back together I can fill the cooling system and run the engine. Then I can see how much excess travel I have from when the clutch is disengaged to the pedal on the floor. Going to a smaller master cylinder will likely need more stroke and changing the pedal ratio will reduce the current stroke, so either one is not an option unless I have excess travel now.

This is the clutch I have: https://www.summitracing.com/parts/ZZZ-MU48-1

Rick
 

sandy

Gold forum user
CAT Member
Messages
349
No problem posting here.

That is a lot of pressure for the clutch pedal. Your pressure plate doesn't seem at all the culprit.

Double check bearing clearance, that could be taking up some of the needed pedal travel to go to a different ratio on the pedal or smaller master.

Definitely check the obvious that the bearing travels freely, and that you are not over stroking the pressure plate. Maybe with the scope or slowly step on the clutch and have someone try to spin the wheels. If you are over stroking, you can likely try a the differen ratio or smaller master.

I used a bent piece of thick welding wire that was just under .1", bent it to make one .2" and checked with that through the opening in the side of the bell as a go/no go. Mine had wiggle room with the .1, and could not fit the .2", feeler gauge might work now that I think of it 😉

I am getting close to getting the engine back in, then can try what I have, but might not be a good comparison as I have Wilwood pedals not stock. Have to look up the pedal ratio to see.
 

Carbuilder

Gold forum user
Messages
107
OK, some more info. I emailed RAM and they really could not suggest anything to try, other than to make sure the master cylinder rod wasn't bending and is moving in a linear motion. No bending and good linear motion.

I bleed the clutch some more, mainly to see that the pedal moves smoothly and easily with the bleed open. It moves very easily and fluid comes out.

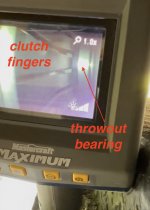
I put my borescope into the tranny and set up my iPhone to film it. You can see the bearing move a little before contacting the clutch fingers, so I think that looks good. Also the clutch seems to operate fine.

Screenshot 2024-08-14 at 4.44.57 PM.jpg

Link to video: https://www.dropbox.com/scl/fi/lw3n...ey=dz2gwmk1fn5moczvtxe1tlfq2&st=zhapms5h&dl=0

Very strange that everything seems to be OK but the clutch effort is about double what it should be.
 

sandy

Gold forum user
CAT Member
Messages
349
OK, some more info. I emailed RAM and they really could not suggest anything to try, other than to make sure the master cylinder rod wasn't bending and is moving in a linear motion. No bending and good linear motion.

I bleed the clutch some more, mainly to see that the pedal moves smoothly and easily with the bleed open. It moves very easily and fluid comes out.

I put my borescope into the tranny and set up my iPhone to film it. You can see the bearing move a little before contacting the clutch fingers, so I think that looks good. Also the clutch seems to operate fine.

View attachment 19835

Link to video: https://www.dropbox.com/scl/fi/lw3n...ey=dz2gwmk1fn5moczvtxe1tlfq2&st=zhapms5h&dl=0

Very strange that everything seems to be OK but the clutch effort is about double what it should be.
Start looking at the obvious 😀

Check pedal for binding, what about the master, is it in good shape, bad piston and o-rings?, wrong type of brake fluid? push rod binding or dragging on the piston, verify size of master, clutch fingers bindind on the bearing sleeve (mine is below or inside the fingers), does the pressure plate actually release the clutch(you mentiond it works fine), clutch in the correct direction? stuff like that. I get tripped up more often than not with the obvious.

The borescope is cool, need to add to the list of useful tools.

As to brake fluid RAM is really ademint about Dot 3 with these, I got a can, but with the Tiltons I have run, I just used dot 5 wilwood racing and no problems. Might have different seal types who knows.

Good luck and post more as you find more out.

Sandy
 

Carbuilder

Gold forum user
Messages
107
I appreciate the suggestions Sandy. Sometimes I do miss the obvious.

In this case, I don't think I have. There is no binding with the pedal or pushrod into the master cylinder. The fluid is DOT 3. As for the master cylinder, I have done more investigating and calculating and come up with this.

I have the correct size master cylinder as recommended by RAM; 3/4" bore with a stroke of 1.1". That gives a fluid transfer of .47 cubic inches per stroke. The area of the piston is .442 square inches.

According to RAM, the hydraulic throwout bearing should have a travel of .5" to cover any type of clutch. They say that .4" is fine for a single disk clutch. Add to that .2" for the gap and the required travel is .42" min. I calculated a piston area of 1.16 square inches for the throwout bearing, then RAM confirmed it was about 1.0 square inches. So using 1 square inch gives a force ratio of 1/.442= 2.26 master to slave.

With a pedal ratio of 5:1 (which I have) that gives a total mechanical/hydraulic ratio of 2.26x5= 11.3.

I tried to measure the force required to move the clutch fingers, using the old clutch, a bathroom scale, and a hydraulic press. Very crude and with the scale only going up to 250 lbs, I did see about 1/16" or more movement on the pressure plate. I read on the net the the force could be as high as 400 lbs. Don't think anyone knows for sure, but let's assume it is 400 lbs.

400 lbs on the clutch would need 400/11.3= 35 lbs on the pedal. That is about what I would expect and what others say is "normal" for a small V8 clutch. So I have double that for some reason.

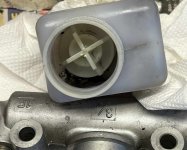
I removed the master cylinder and ordered a new one for several reasons.

1) It is the only part of the system that isn't new

2) Even before I started any work on the car the clutch pedal seemed harder than it should have been, so something was off right from the start.

3) More importantly perhaps, the old master cylinder reservoir fluid had a black tinge to it and some "stuff" in the bottom of it. When I removed it and took the reservoir off I could see black stuff in the bottom of it. Tiny particles of seal rubber? I don't see how that could make a clutch harder (you would think a bad seal would allow fluid to go around the seal and not build up pressure) but since it doesn't look good, I'll replace it. With it out I can push the piston and squirt fluid out, so it's not like the rubber stuff blocked it.

Having that off I can confirm that the pedal has no binding in it. I seem to recall pushing the piston of the throwout bearing back and forth before installing it, so that should be good. Any kind of restriction in the line should have shown up with bleeding the system....bleeding was effortless.

I'll let you know if I find anything else and what happens with the new master cylinder.

Rick

Edit: I took the master cylinder apart and it is in perfect condition inside. Seals are good, no scoring in the bore, no pieces of rubber in it, none of the passages plugged. I'll put the new one in when I get it, though hard to imagine it making a difference. I thought then maybe I assembled something wrong...the clutch? Not sure how I could have assembled it wrong. And the pedal effort was harder than it should be with the original Centerforce clutch.

Screenshot 2024-08-15 at 7.55.03 PM.jpg

Screenshot 2024-08-15 at 7.55.26 PM.jpg
 
Last edited:

sandy

Gold forum user
CAT Member
Messages
349
For the numbers on the Centerforce clutch, hopefully you had something that pressed on the ends of the fingers, not the counter weights as that might not be good since the leverage point may be different. The rest of the stuff you did seems to confirm that something is just, I can't think of anything else other than the master. Check math on the master calcs, if you have .4" of needed movement, and a gap of .2" you will need .6", that still would not account for the heavy pedal.

I wonder if the master is bad enough to cause this, doesn't seem like a failure point, usually they make less pressure and bleed down, but who knows. Maybe the piston and o-rings are so worn that's it's binding.

Easy to find out when the new master is in hand. I dig your testing and scientific approach to finding the issue, especially with the bathroom scale, my kind of project!

Sandy
 

Carbuilder

Gold forum user
Messages
107
Yes, the Centerforce clutch test looks like I am pressing on the weights, I'm not. It is pressing on the fingers. And yes, my math was wrong.

I replaced the master cylinder with a new one. No difference. Well, there is a difference in how the clutch feels. It feels like the first 1/3 of the travel doesn't do much, then it gets very hard for the last part. I have bled it several time and am sure there is no air in the system. Don't know why it feels like that.

I bought a cool little inspection camera. This is pretty cheap (around $30 US) and it plugs into a phone to use it's screen. Very small diameter (will easily fit in a spark plug hole) with bright LED's on the end of it. But I digress. With the long cable on this one I managed to zip tie it in place to see the clutch actuation while in the car pressing the clutch. You can clearly see the clutch fingers moving as the hydraulic bearing presses on it. Looks like movement right from the start which would be correct, and looks like a sufficient movement. The only issue is, is that it takes too much clutch pedal force to do this. Oh, and with the engine running, I can't get it in any gear, so it seems that the clutch is not releasing. Something wrong with the clutch or my installation of it?


So something is clearly wrong, though all the components and setup seem OK. My first plan was to try and move the tranny back to see if the clutch and bearing look OK. There is no way to get at the front bell housing bolts, but the rear ones are not too bad to get to. I removed the bolts and a few other things and moved the tranny rearward. But it would only move about 1 1/2" before running out of room in the tunnel. And, I realized the with the hydraulic lines connected to the bearing, it couldn't come out through the rear of the bell housing anyways.

Time to get serious and dig into it. The plan now is to take enough off to allow the engine/tranny to move forward as much as possible (without taking the front subframe off). If I take the steering rack out, the rad, and then remove the header bolts from the engine, and the mounting bolts from the engine, it should let it move forward (leaving the headers and engine mounts not moving) to get at the front bell housing bolts, then push the tranny back and hopefully see the clutch area. Unless I find a snag that my plan hasn't accounted for.....very likely.

That's tomorrow's project.

Rick
 

Carbuilder

Gold forum user
Messages
107
Solved!!

I finally got the engine out so I could have a good look at the clutch and throwout bearing. Note: do not try and remove the engine leaving the Hokanson front cradle in place; yes, you can do it, but not worth it. Info in one of my threads.

Anyways, everything looked good:

Screenshot 2024-09-04 at 5.05.17 PM.jpg

Screenshot 2024-09-04 at 5.05.30 PM.jpg

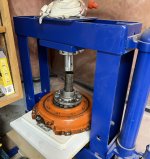
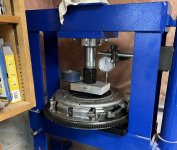
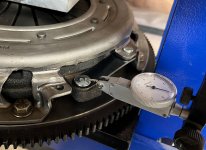
I borrowed a friends valve spring tester. This is a small gizmo that measures force up to around 600 lbs. With that I did a more scientific test of the clutch. I put a dial indicator on the input side of the pressure plate (the fingers). So I was measuring the input travel distance the force to get there.

Screenshot 2024-09-04 at 5.06.08 PM.jpg

I went up to almost 600 lbs to get the .4" input that most clutch manufacturers recommend. But I didn't see the pressure plate moving at all. I put another dial indicator on that:

Screenshot 2024-09-04 at 5.06.37 PM.jpg

Nope, no movement at all.

To make sure I was doing things correctly I put the Centerforce clutch that came out of the car on to the test fixture:

Screenshot 2024-09-04 at 5.06.52 PM.jpg

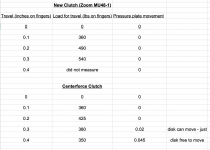
Here are my results from the testing:

Screenshot 2024-09-04 at 5.16.07 PM.png

So it seems that I have a bad clutch. Very strange, never heard of that before. I emailed Summit Racing (where I purchased it) with all my data and they said to return it under warranty. I am.

I inspected the clutch as best I could and can't see what the issue is.

Rick
 

Carbuilder

Gold forum user
Messages
107
Got the replacement clutch from Summit and tested it with the hydraulic press. Works as it should. Input movement of .3" takes 450 lbs and moves the pressure plate enough to disengage. Should give a pedal effort of around 41 lbs.
 

spmdr

Gold forum user
CAT Member
Messages
385
BTW, if there was any shutter or less than perfect clutch

function, I would check the runout of your flywheel

surface. Perfectly great looking New Flywheels can and

DO have less than perfect machining.

right out of the box....

DW
 

sandy

Gold forum user
CAT Member
Messages
349
Crazy, bad pressure plate, glad you got it sorted. One nice thing about summit is they are good with replacement of a bad part.

Now the fun part, put it all back together!
 

Carbuilder

Gold forum user
Messages
107
Yes, Summit was very good about it. Didn't even seem to care much about all the testing I did. :cry:

They also said not to bother sending the old one back, so I've had a good comparison look at both of them. Can't see any difference.
 

sandy

Gold forum user
CAT Member
Messages
349
Assembled wrong with poor tolerance Chinesium parts likely the issue...

Glad you are back in business
 

sandy

Gold forum user
CAT Member
Messages
349
Added the Russell bleeder port to the firewall, also added a Halon nozzle while drilling holes.

20240905_165118-sm.jpg


20240905_165125-sm.jpg
 
Top