Engine drop plan - and progress

sandy

Gold forum user
CAT Member
Messages
380
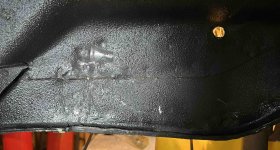
I may trim those interfering areas of the frame flange down a bit.

A question for you. I haven't dropped the engine yet, but see the way I installed the engine lift? In your picture it is the other way around. I assumed the way I put it would allow me to lower the tranny end of things, but also allow it to hang level. So I put the pivot/hanging pin at the rear. Does it matter which way I install it?
I think I had it the other way, but can't remember for sure. I also used a cherry picker in front of the car.

The way it looks like you have it configured it would tilt the back of the engine up, You want the the front to come up a bit once you pull free of the transmission as I recall. Let me look at some old pics and see if I can see.

Sandy
 

sandy

Gold forum user
CAT Member
Messages
380
1702430479809.png

This is how I bolted it on, so you may be backwards on how you did it
 

Carbuilder

Gold forum user
Messages
117
OK, I'll swap it around. I was just trying to guess the balance point of the engine/tranny combination. Swapping it around also makes it easier to access the large nut to adjust the angle.
 

Carbuilder

Gold forum user
Messages
117
I think I ground those areas flat so I could slide the hokenson bits up easier. Wasn't a big deal on my car, buy could see others not wanting to grind on a nice Tiger 😀
Those areas were ground down on mine. But you can also see how the upper joint was rubbing pretty seriously into the sheet metal. May give that a bit of a massage with a ball peen.
Screenshot 2023-12-13 at 3.02.04 PM.jpg
 

sandy

Gold forum user
CAT Member
Messages
380
I don't think mine hit but will have to look. I was going to change out the rubber bushing ends but it's not quite as easy getting replacements, and the builder drilled out the holes in the cross shafts larger for some reason, not a huge issue but getting info out of SPC on the bushings and cross shafts on what will work has cost some time and returned parts. One more thing to look at... Might just leave the rubber bushing ones in now :)

Sandy
 

Carbuilder

Gold forum user
Messages
117
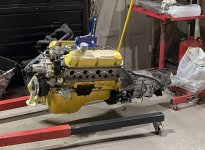
It's out! Not an easy job, not a horrible one.

A few points. It is very, very tight. I took the weight of the engine/tranny with the hoist and remove the engine mounts. Are those the stock engine mounts? Pretty cool the large cast piece. That went well. I left the headers on and still aren't sure if it was possible to remove the engine with them on. The engine/tranny moved forward a few inches, then the headers were rubbing on the frame. I moved it up/down/in/out and was not comfortable with how much it was rubbing. So since the engine was moved forward at this point, access to the header bolts wasn't too bad. I took the left side one off. The steering U-joint was removed, so to do that involved loosening the steering shaft clamps in the engine compartment and under the dash. So I could pull the column out of the way of the header bolts. One mistake I made was not removing the spark plugs first. So the header dropped down onto the spark plugs and didn't help with clearance too much. But then I had real trouble getting a spark plug socket on the plugs with the header dropped down onto them. 3 weren't too bad, one was a PIA and took about 20 minutes to remove. But, at that point the header dropped down and I removed it. Removing the engine/tranny was easy after that.

The engine did have to come forward quite a bit to release the rear of the tranny. The adjustable lifting plate, on the intake manifold, is fantastic. Especially with a power ratchet on it; so easy to change the angle of the engine/tranny.

So now the fun part starts, taking the engine apart.

Rick
ps. Don't be fooled with how clean things look. The coolant was all drained before dropping the engine. After the engine out picture was taken I pulled the rag out of the water pump and a litre or so of coolant came out. Where it was hiding I don't know. The large bag of absorbent, that I thought would last me years, is gone. Oh well.

Screenshot 2023-12-13 at 8.33.57 PM.jpg
Screenshot 2023-12-13 at 8.34.28 PM.jpg
Screenshot 2023-12-13 at 8.46.48 PM.jpg
Screenshot 2023-12-13 at 8.33.31 PM.jpg
 

HolyCat

Gold forum user
CAT Member
Messages
1,300
Rick,

Thank you for sharing all that you went through. I am sure that others will benefit from your efforts. Good luck with the engine itself.
 

0neoffive

Gold forum user
CAT Member
Messages
2,954
It's out! Not an easy job, not a horrible one.

A few points. It is very, very tight. I took the weight of the engine/tranny with the hoist and remove the engine mounts. Are those the stock engine mounts? Pretty cool the large cast piece. That went well. I left the headers on and still aren't sure if it was possible to remove the engine with them on. The engine/tranny moved forward a few inches, then the headers were rubbing on the frame. I moved it up/down/in/out and was not comfortable with how much it was rubbing. So since the engine was moved forward at this point, access to the header bolts wasn't too bad. I took the left side one off. The steering U-joint was removed, so to do that involved loosening the steering shaft clamps in the engine compartment and under the dash. So I could pull the column out of the way of the header bolts. One mistake I made was not removing the spark plugs first. So the header dropped down onto the spark plugs and didn't help with clearance too much. But then I had real trouble getting a spark plug socket on the plugs with the header dropped down onto them. 3 weren't too bad, one was a PIA and took about 20 minutes to remove. But, at that point the header dropped down and I removed it. Removing the engine/tranny was easy after that.

The engine did have to come forward quite a bit to release the rear of the tranny. The adjustable lifting plate, on the intake manifold, is fantastic. Especially with a power ratchet on it; so easy to change the angle of the engine/tranny.

So now the fun part starts, taking the engine apart.

Rick
ps. Don't be fooled with how clean things look. The coolant was all drained before dropping the engine. After the engine out picture was taken I pulled the rag out of the water pump and a litre or so of coolant came out. Where it was hiding I don't know. The large bag of absorbent, that I thought would last me years, is gone. Oh well.

View attachment 18686
View attachment 18687
View attachment 18688
View attachment 18689
FYI: Caution using a power ratchet on that angle screw. The threads can/will gall & lock up on Ya. Been there, done that.
 

Austin Healer

Gold forum user
Messages
1,548
you will have to remove the RH header, the left can stay attached. you have to lower the front of the engine first and then slide forward so the transmission can clear the cruciform...
 

Carbuilder

Gold forum user
Messages
117
you will have to remove the RH header, the left can stay attached. you have to lower the front of the engine first and then slide forward so the transmission can clear the cruciform...
I removed the LH header and left the right one attached. It seems that removing either one gives enough clearance.
 

sandy

Gold forum user
CAT Member
Messages
380
Nice Job! Now you can do the fun and easy stuff.

I lubed up the acme thread screw as well with a bunch of axle grease, no problem with a slow turning drill to move it.

Thanks for sharing all the pics as well!

Sandy
 

Carbuilder

Gold forum user
Messages
117
I'll continue with this thread as there may be some stuff in it that others will find useful at some point.

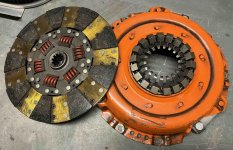
First, the mystery of the clutch. The clutch pedal effort was very high, so I suspected a heavy duty clutch was installed. As soon as I pulled the tranny off I said "yup, a Centerforce clutch". You can tell by the weights and the orange color.

Screenshot 2023-12-15 at 1.01.58 PM.jpg

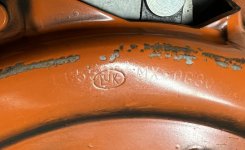
But not so fast! A closer look shows it to be an LuK clutch. Huh?

Screenshot 2023-12-15 at 1.02.30 PM.jpg

I looked up LuK clutches and couldn't find any with the weights or the orange color. Doing more research and I found that LuK makes the clutches for Centerforce; Centerforce may do some mods to them before selling them, not sure.
Pretty sure I want to replace it anyway with a stock one. I think the stock one should be OK with the reduced power I am going for, and in a fairly light car with street tires.

Rick
 

sandy

Gold forum user
CAT Member
Messages
380
Yep, 100% Centerforce. I have never liked those pressure plates, always felt they were unnecessary and a gimmick. No comments from all that love them, I'm sure they work great, just never really like the idea of them. A regular diaphragm pressure plate will do the job.

One thing to note that you high pedal pressure can be possibly solved or caused by other parts. For example, changing to a different master cylinder size, or mods to the clutch slave (I think you can find that info here on this site). A few things influence the pedal pressure besides the pressure plate.

If your heavy pedal was at idle/starting out, it's likely that the Centerforce's feature of the weights are not at play, and affecting the pedal that much as they are supposed to "kick in" at some higher RPM so It may be a just a foot heavy pressure plate, but you should be able to find out more if you can find the part number or a match on their website.

Sandy
 

Carbuilder

Gold forum user
Messages
117
Sandy, you're certainly not the only one who is not a Centerforce fan. I sent my friend who builds engines some pictures and the first thing he said was "Centerforce - useless garbage. Marketing hype that a lot fell for. Depending on what the material those discs can be pretty hard on the flywheel as well so have a good look". Another friend had vibration problems and traced them to nothing keeping the weights at the same radius. I can't find any part numbers on the clutch that I can find in a search. I agree that the master and slave cylinders will have a large effect on the clutch pressure. I'll see what measurements I can take and info I can find. Fun stuff!

Rick
 

Theorangetiger

Gold forum user
CAT Member
Messages
352
Based on recommendations here, I'm running a standard diaphragm clutch by Luk and am really happy with it. It's really smooth and certainly seems capable of handling my 330ish HP 289. Works fine with the stock hydraulics.
 

Carbuilder

Gold forum user
Messages
117
Progress report.

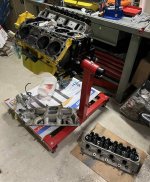
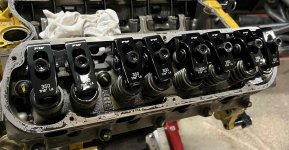
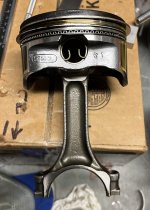
The engine strip is going well:

Screenshot 2023-12-19 at 6.10.23 PM.jpg

Screenshot 2023-12-19 at 6.33.20 PM.jpg

Screenshot 2023-12-26 at 12.43.05 PM.jpg

Those stroker pistons are really short! They have a 5cc head volume and I'm going to replace them with ones with a 16cc volume to lower the compression. One strange thing is that it has .080" thick head gaskets. Maybe that was done to lower the compression, but it really messes up the quench volume. The pistons do protrude about .010" above the deck at TDC, but that still leaves about .070" quench, which is really not great; should be more like .040".

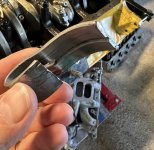
One really weird thing is that I found this in the oil pan:

Screenshot 2023-12-20 at 4.46.22 PM.jpg

Looks like a main bearing. Fortunately it doesn't look like it came out of this engine. Don't see how a bearing can work its way out with all the cap bolts in place. Also, nothing looks beat-up from metal flying around, so I assume it is heavy enough that it just stayed in the bottom of the oil pan. The pan is pretty deep. How it found its way there? Not sure how you could install an oil pan without seeing that in it.


Fun stuff taking the engine apart!

Rick
 

Austin Healer

Gold forum user
Messages
1,548
I removed the LH header and left the right one attached. It seems that removing either one gives enough clearance.
It's easier to remove the right side, than the left! You'll find that it's much easier to install the engine with the left header installed and the right one uninstalled...
 

sandy

Gold forum user
CAT Member
Messages
380
Progress report.

The engine strip is going well:

View attachment 18717

View attachment 18718

View attachment 18719

Those stroker pistons are really short! They have a 5cc head volume and I'm going to replace them with ones with a 16cc volume to lower the compression. One strange thing is that it has .080" thick head gaskets. Maybe that was done to lower the compression, but it really messes up the quench volume. The pistons do protrude about .010" above the deck at TDC, but that still leaves about .070" quench, which is really not great; should be more like .040".

One really weird thing is that I found this in the oil pan:

View attachment 18720

Looks like a main bearing. Fortunately it doesn't look like it came out of this engine. Don't see how a bearing can work its way out with all the cap bolts in place. Also, nothing looks beat-up from metal flying around, so I assume it is heavy enough that it just stayed in the bottom of the oil pan. The pan is pretty deep. How it found its way there? Not sure how you could install an oil pan without seeing that in it.


Fun stuff taking the engine apart!

Rick
It's nice to see the previous builder was meticulous when he built the engine 😀

I'll bet you find other fun stuff as you go...

Nice progress!

Sandy
 

Austin Healer

Gold forum user
Messages
1,548
Progress report.

The engine strip is going well:

View attachment 18717

View attachment 18718

View attachment 18719

Those stroker pistons are really short! They have a 5cc head volume and I'm going to replace them with ones with a 16cc volume to lower the compression. One strange thing is that it has .080" thick head gaskets. Maybe that was done to lower the compression, but it really messes up the quench volume. The pistons do protrude about .010" above the deck at TDC, but that still leaves about .070" quench, which is really not great; should be more like .040".

One really weird thing is that I found this in the oil pan:

View attachment 18720

Looks like a main bearing. Fortunately it doesn't look like it came out of this engine. Don't see how a bearing can work its way out with all the cap bolts in place. Also, nothing looks beat-up from metal flying around, so I assume it is heavy enough that it just stayed in the bottom of the oil pan. The pan is pretty deep. How it found its way there? Not sure how you could install an oil pan without seeing that in it.


Fun stuff taking the engine apart!

Rick
I'd check the head thickness to see how far they've been milled. That's the only reason I can think of .80" thick head gaskets....
 
Top